This will produce a barre that's about 43" tall (the standard height) with a second/lower barre across.
Step 0: Decide how long you want the usable part of the barre to be. A standard portable barre is 4 feet (48") or 5 feet (60"). (Keep in mind that about 2" of the length will get absorbed by connectors; if you're making a short barre, you might want to add 2" to your desired length to get your cut length.) My barre is short to save space, and I got 40" pieces cut. We'll call your cut length L" and use this in Step 4.
Step 1: Go to Home Depot (or another store that carries PVC pipe and will cut it to your desired lengths for no extra charge).
Step 2: Grab two 10-foot lengths of 1.25" PVC pipe. FYI, the inner diameter is 1.25". The outer diameter is about 1.5".
Step 3: In a nearby area there will be rows of boxes of connectors that go with the PVC pipe.
Get
6 elbow connectors (the 90-degree kind, not the 45-degree kind) in size 1.25". (These have about 2" outer diameter.)
4 T-connectors in size 1.25".
Step 4: Find a staff member who can cut your pipe for you, using a neat tool called a ratchet cutter.
From the first 10-foot length, have the person cut
6 pieces 10" long each.
2 pieces 26" long each.
There will be a bit left over; because a 10-foot length of PVC pipe is a flat price, you get to keep that bit for... who knows what.
From the second 10-foot length, have the person cut
2 pieces L" long each.
There may or may not be some pipe left over depending on your value of L.
Step 5: Go to a craft store such as Michael's and get a sheet of thin foam rubber that is sticky on one side. (The sticky side will be protected with waxed paper.) You'll need this later to make your barre not slide around on a wooden or tiled floor.
If you prefer felt pads, Oleg Spirt points out that places like Home Depot carry 4-packs of 2-inch circular heavy-duty self-adhesive felt pads for about $4. (If you go this route, skip Step 8.)
Step 6: When you get home, remove any stickers that happen to be on your PVC pieces. Wash all the pieces with dish detergent and a sponge; rinse them; towel them dry (including the insides---or air dry these things for hours so you don't have moisture trapped inside).
Step 7: Assemble the pieces, which is to say, just stick them together firmly, according to the following diagram. Keep in mind that there is printing on lots of the tubes and you'll want that pointing downward so you don't have to see it.
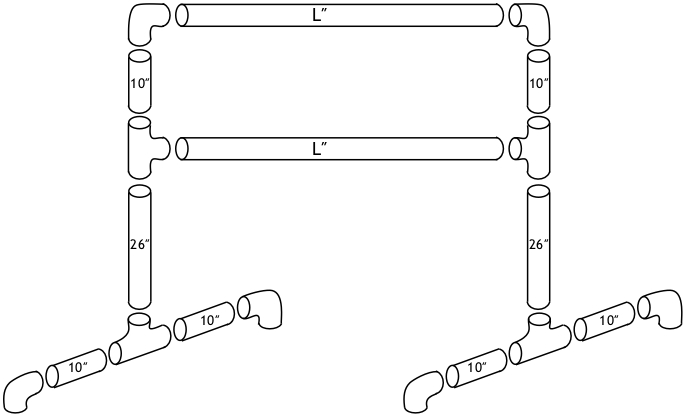
How to put all the PVC pieces together.
Step 8: Cut 2" square pieces from your foam-rubber sheet. These will become "feet" for the posts of the barre, each of which is 2" in exterior diameter.
Step 9: Turn the barre on its side so you have access to the bottom. For each post of the barre, peel the backing off a foam square, center the square on the post (with the sticky side toward the barre), stick it on, and fold the corners up to stick on the sides of the post.
Step 10: Place the barre upright wherever you want to use it. Enjoy.
Sources used in figuring out what to do:
The Dance Buzz: The Search for Portable Ballet Barres (For the assembly diagram)
createbellacreate: DIY Tutorial Free Standing Ballet Barre {How to Make} (Her barre is taller and has larger diameter tubes)